Tutorial
This tutorial will guide you through the basic functions of EasyOCR. To use EasyOCR, first we import it like this.
import easyocr
Next, we need to tell EasyOCR which language we want to read. EasyOCR can read multiple languages at the same time but they have to be compatible with each other. English is compatible with all languages. Languages that share most of character (e.g. latin script) with each other are compatible.
In this tutorial, we are going to read text in the below image.

So we need to read Traditional Chinese and English.
We put language codes in list format and pass it as the first argument for Reader object.
In this case, it is ['ch_tra', 'en'].
reader = easyocr.Reader(['ch_tra', 'en'])
EasyOCR will then check if you have necessary model files and download them automatically. It will then load model into memory which can take a few seconds depending on your hardware. After it is done, you can read as many images as you want without running this line again.
Other than list of language code, there are several optional arguments we can pass here.
The first one is gpu which is True by default, meaning that EasyOCR will try to use graphics processing unit(GPU) in computation if possible.
If you do not want to use GPU, you can just set gpu=False.
For user with multiple GPUs, you can also specify which one you want to use here, for example gpu='cuda:0'.
Another optional argument is model_storage_directory. This is used to set where EasyOCR stores model files.
If not specified, it will be at ~/.EasyOCR/model.
To get text from image, just pass your image path to readtext function like this.
result = reader.readtext('chinese_tra.jpg')
Standard output is in list format, each item represents lists of text box coordinates [x,y], text and model confident level, respectively.
[([[448, 111], [917, 111], [917, 243], [448, 243]],'高鐵左營站',0.9247),([[454, 214], [629, 214], [629, 290], [454, 290]], 'HSR', 0.9931),([[664, 222], [925, 222], [925, 302], [664, 302]],'Station',0.3260),([[312, 306], [937, 306], [937, 445], [312, 445]],'汽車臨停接送區',0.7417),([[482, 418], [633, 418], [633, 494], [482, 494]],'Kiss',0.9577),([[331, 421], [453, 421], [453, 487], [331, 487]], 'Car', 0.9630),([[653, 429], [769, 429], [769, 495], [653, 495]], 'and', 0.9243),([[797, 429], [939, 429], [939, 497], [797, 497]],'Ride',0.6400)]
Result is ordered from top to bottom. As you can see, this may not follow natural human reading yet but we have an option to automatically combine these words at the end of this tutorial. Stay tune!
Instead of filepath chinese_tra.jpg, you can also pass image as numpy array (from opencv),
img = cv2.imread('chinese_tra.jpg')result = reader.readtext(img)
image file in bytes format,
with open("chinese_tra.jpg", "rb") as f:img = f.read()result = reader.readtext(img)
or URL to image.
result = reader.readtext('https://www.somewebsite.com/chinese_tra.jpg')
The standard output may look too complicated for many, you can get simple output by passing optional argument detail like this reader.readtext('chinese_tra.jpg', detail = 0).
And this is what you will get.
['高鐵左營站', 'HSR', 'Station', '汽車臨停接送區', 'Kiss', 'Car', 'and', 'Ride']
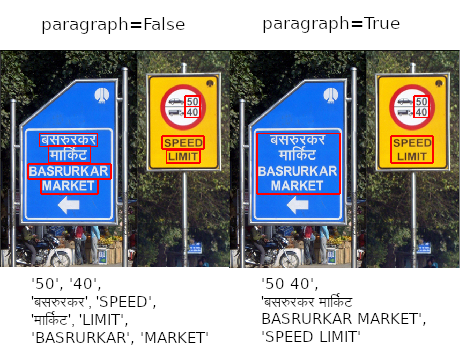
Another useful optional argument for readtext function is paragraph.
By setting paragraph=True, EasyOCR will try to combine raw result into easy-to-read paragraph.
Here is the result with reader.readtext('chinese_tra.jpg', detail = 0, paragraph=True).
['高鐵左營站 HSR Station 汽車臨停接送區 Car Kiss and Ride']
Here is another example.

For complete list of optional arguments, please see API documentation